I know the title rhymes, lets be honest – rhyming title – definitely the way to go. Today’s topic is VNC – virtual network computing – which is basically controlling one computer from another. Let me explain what this means with an example.
Imagine you needed to rip a cd to iTunes but had to leave for work. With VNC, you could put the CD in your computer’s CD drive, go to work, login to your home computer and start ripping the CD – you have complete control over your computer and see in a window at your work computer everything you would see on your screen at home. Its pretty amazing stuff, and all you need to use it is this guide, a turned on computer, and an internet connection.
VNC is free, and available for both OSX and Windows. Therefore, to avoid confusion, I have written two posts, one for OSX (which is below), and one for Windows XP users (which you can find here).VNC allows you to control any networked computer (PC or Mac) from within a window on your computer – all for free. Even though it sounds quite complicated, both setting it up and using it is actually quite simple (and impressive when people see you using it). VNC can be useful for a couple of reasons:
- working on your home computer when traveling
- working with a computer that has no monitor
- showing friends or family something on the computer
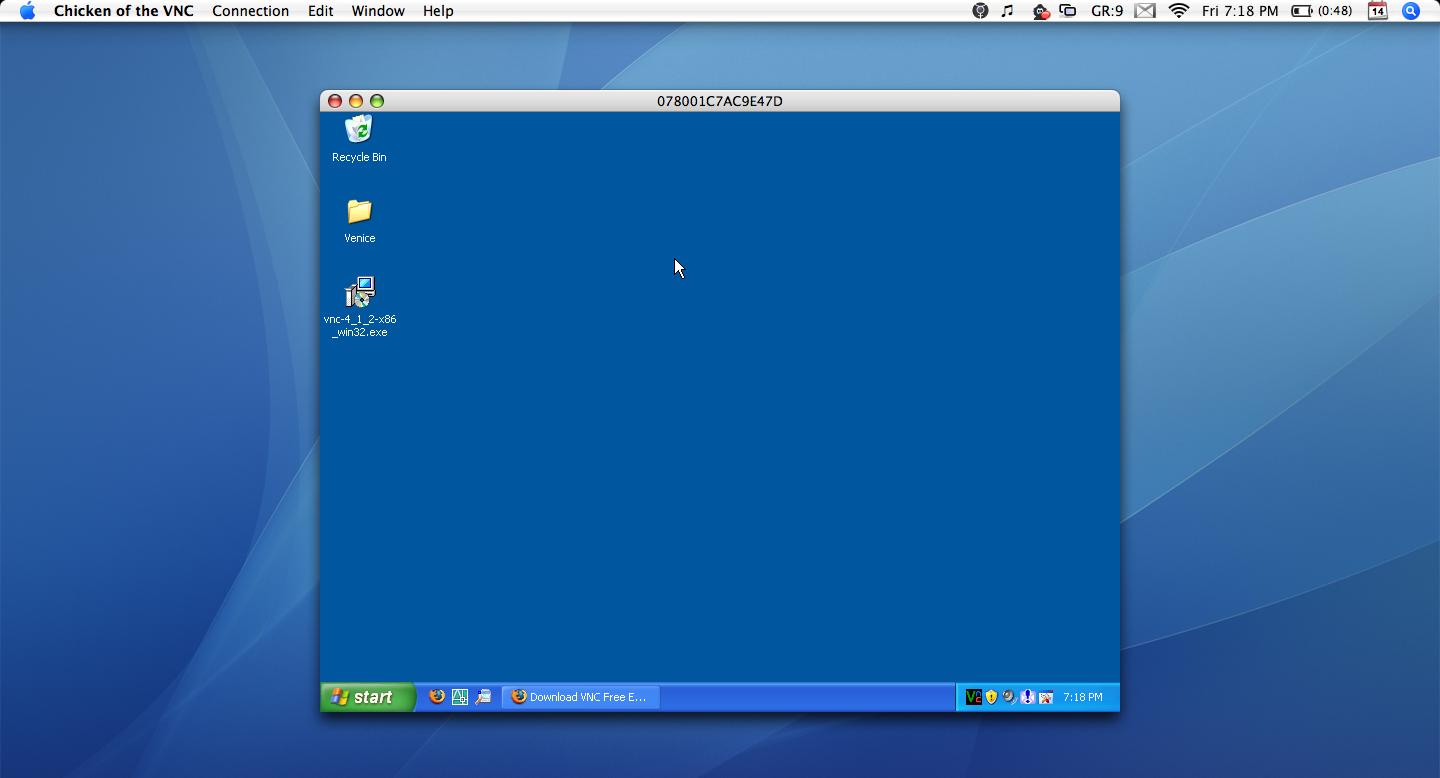
I want this post to be as simple and as visual as possible, so let me start by showing you what VNC looks like when its running:
As you can see, there is Windows XP running inside of a window in OSX, with a mouse and all (the resemblance to Parallels is there, but I assure you this is VNC). All I have to do is move my mouse and the windows mouse moves too, and when I type with my keyboard in the VNC window, its just like typing on the guest computer that I’m logged into. Its that simple to use. For reference, I will refer to the computer you want to log into as the server, and the computer you are on as the guest. Note: you can only control a computer that is on a network that you have administration access to – school and public networks probably won’t work. However, you can control a server computer from anywhere with an internet connection.
Here’s how we are going to set it all up:
1. Setup the server computer
2. Configure the hardware
3. Setup the guest computer
With all of that said, lets begin.
Step 1
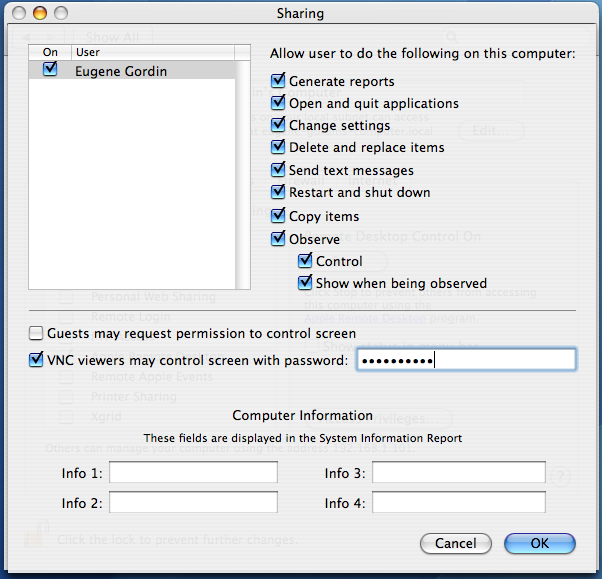
The setting up the computer you want to access. One of the many nice things about OSX (10.4 Tiger) is that it has VNC server software built in. To activate it, go to System Preferences –>Sharing and check the box next to Apple Remote Desktop. Once you do that, a new window will open up that lets you configure VNC. Check the box next to the username that you want to use VNC with (probably your username), and also check the boxes so that they match the ones in the screen shot below.
The last thing to do on this window is to check the box next to “VNC viewers may control screen with password:” and put in your VNC password. Make your password is alphanumeric and something only you would know – it is the only thing between your entire computer and someone trying to get in!
Now we need to make it easy for you to access this computer from somewhere else. Although there are a variety of ways to do this, I prefer using a free service called No-Ip.com. Basically, this website allows you to create an easy to remember web address for the server computer. Here’s what you need to do.
- Go to www.no-ip.com, click Sign-up Now!, and fill out all of the required fields
- Click on the apple logo on the next page under select your operating system, download the client for OSX, and once its downloaded, install it.
- Check your email for the account confirmation and confirm your account
- After the webpage says that your account is confirmed, login with your email address and password on the no-ip.com site.
- You should see a left hand column with Hosts / Redirects at the top and an Add link below it. Click on the Add link. On this Add a Host page, only input a unique hostname and click the Create Host button at the bottom of the page. With this hostname, the address to your computer will be: yourhostname.no-ip.info (much simpler than 54.223.2.134 right?).
- Launch the now installed No-IP.com Update Client, (put in your computer password), and in the form enter your email address and password that you signed up with. Now under Host Names to Update you should see the hostname you chose when on the no-ip website. Check the box next to that hostname, and then click on the Daemon Tab (a daemon is just a program that runs in the background invisibly). On this tab click on update daemon settings, and start the daemon and enable the checkbox next to Launch Daemon at System Startup. Now close the No-IP Update Client. You’re all done with step one – onto step 2!
Step 2
Those of you not behind a router can go directly to step 3. This step only applies to those of you who are behind a router (if you are on a network with multiple computers, you are behind a router). The key to this crucial step is having access to the router – not physical but through a web browser. If you don’t have the username/pasword to the router, you should get access because otherwise this isn’t going to work and you can stop here.
There are lots of different routers out there, and a simple google search will tell you how to forward your ports. For your convenience, this site has instructions on forwarding the right ports for VNC for almost every router.
That link will explain how you forward a port in general for VNC. Here’s what you need specifically:
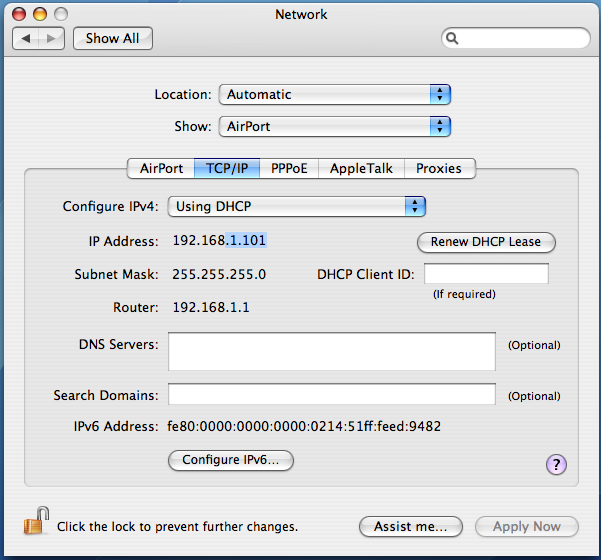
- Your local IP Address: Go to System Preferences –> Network –> Either Airport or Built-In Ethernet (depending on which one you’re using) –>TCP-IP. Next to IP Address is, well, your IP address. This is the address that you forward the ports to.
- Port to forward: 5900.
Once you forward port 5900 to your local IP address, that’s about it for step two. Make sure that if you have your firewall in OSX enabled, that you allow port 5900 to go through also. I know that some might have questions about this step, so please leave me questions in the comments section for this post, and I will answer them. Here comes the third and final step!
Step 3
This is the simplest of all of the steps. For this step, you should be on another computer i.e. not the server computer. If the guest computer is a Mac, download and install a program called Chicken of the VNC. If the guest computer is a PC, see step 3 for PC. Chicken of the VNC allows you to view the server computer.
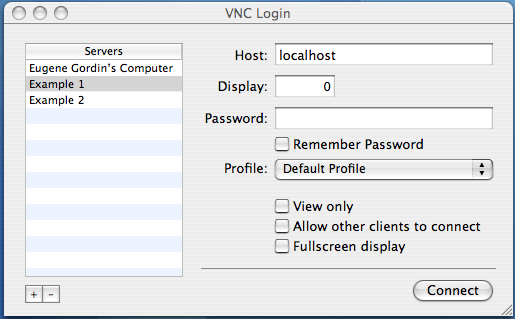
Once installed, run the program and you should see a screen similar to the one to the left. Just click on the + button to add a new server, and then input the hostname you chose for your server computer in step 2. If you forwarded port 5900, then the corresponding Display number is 0, if you forwarded 5901, the display number is 1, and so on. Under password you input the password you chose in the system preferences in step 1. The rest of the options are self explanatory for the most part.
Click connect, and if you set everything up correctly, the server computer should be in front of you :). Enjoy.
PS This is one of my longest posts and covers a pretty complicated topic. I tried to make it as simple as possible, but I would love to answer any questions or clear up anything I brushed over. Thats what the comment link is for below 🙂
