SpeeDF

August 24th, 2012

Speed up printing to PDF on the MacAs time goes on, I print more and more to PDF, both at work and at home. The excellent PDF support built into every Mac makes this process even easier, and David Sparks’ excellent keyboard shortcut for “Save as PDF…” simplified this process even further. Thanks to David, all you needed to do to print to PDF was to press CMD+P once (print dialog appears) and press CMD+P a second time (PDF Save dialog box appears). Superb.

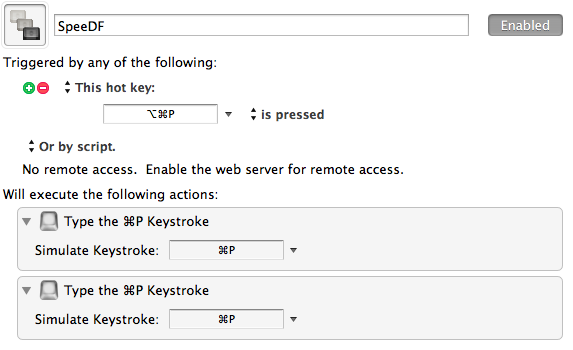
But since most of the printing that I do these days is PDF printing, I decided to use Keyboard Maestro1 to make things even simpler for those who love keyboard shortcuts. The result is what I call SpeeDF 2, which allows you to print to PDF with a single shortcut. The Keyboard Maestro macro could not be simpler.

All it does is automate David Sparks’ method and assigns it to CMD+Option+P. Have I mentioned that I love Keyboard Maestro?

  1. Get 20% off your purchase with this link.
  2. I’m a sucker for a pun

Tracking App Usage

August 23rd, 2012

I’m a sucker for usage statistics, whether its energy usage through my Nest or app usage though graphs like the one Alfred beautifully provides its users. I wish more applications would provide this feature. Sure, some apps like TextExpander and Keyboard Maestro track some statistics, but graphs for this type of information are just more interesting.

Luckily, using Keyboard Maestro, Dropbox, and Excel, I created a way to automatically track and graph my app usage across both of my Macs. The end result1 looks like this (click for larger image):

My goal was to track my usage of Trickster, a fantastic application that I knew I used frequently, but didn’t know exactly how often. Here’s how I did it.

Step 1: Keyboard Maestro

I created a single action Keyboard Maestro macro that is triggered when Trickster activates (see screenshot at right). I am not sure how Keyboard Maestro defines “activation,” but since Trickster is a dockless menubar application, I would imagine that the definition is pretty universal (also works with Adium, Mail and Safari). When this macro is triggered, Keyboard Maestro appends an existing plain text file with a date stamp, time stamp, and an identifier for the current Mac, each separated by tabs. The entire line is followed by a line break, making a new line for the next usage stat. All together, the line looks like this:

%ICUDateTime%MM/dd/yyyy hh:mm% %MacName%\n

The ICUDateTime text token allows you to have full control over the format for the date and time stamps, while the “\n” creates a new line (can also be done %LineFeed% but \n is shorter. Be sure to not include a space before the backslash, as this just crowds the data.

Step 2: Dropbox

To combine the usage statistics for multiple Macs, I used Dropbox, which is excellent for this type of use. Specifically, all you need to do is to make sure that the plain text file that you’re appending with Keyboard Maestro is located in your Dropbox folder. That’s it – gotta love Dropbox.

Step 3: Excel

I used Excel to process the text file and graph the results. I used Excel 2010 for Windows – which I use daily at work through Parallels, but Excel 2011 for Mac may also work with some adjustment (Numbers unfortunately won’t work as easily or automatically). I’m sure someone like the excellent Brett Terpstra or Dr. Drang or Gabe Weatherhead can come up with a better way to graph the results, but this was the most logical for me.

This was probably the most complicated step, but since my spreadsheet is available for download along with this post, it should be a bit easier for others to use and adapt it to their needs. My approach automatically updates my spreadsheet with the latest usage data from my plain text usage file upon opening the spreadsheet, but you could also simply paste the contents of your plain text file into the spreadsheet if it was set up that way. The spreadsheet includes instructions to point Excel to your data text file in order to enable the automatic updating.

For those interested in the details, the spreadsheet is taking advantage of some very useful Excel features behind the scenes. Specifically, the spreadsheet is automatically importing and parsing the plain text file upon opening the file using external connections. This data is then automatically processed into a PivotChart (“Graph” sheet) by way of a PivotTable (“Summary” sheet). The average usage values are themselves a PivotTable calculated from the PivotTable using dynamic named ranges. In addition to automatically refreshing the table with the latest data from your text file, the spreadsheet also uses a macro to automatically update the Summary and Graph worksheets when you activate those sheets.

My end goal is to set up a spreadsheet that calculates these statistics for a few more applications at once, but for now this works very well. I’m positive there are more efficient ways to generate (and share) these usage graphs, so please let me know if you come up with something better.

Download my App Tracking Spreadsheet (v0.4)

See all my Keyboard Maestro posts.

  1.  The “either” item in the graph and averages exists because I realized that I could track my individual Mac usage only after I had been using this tracking system for a few weeks

Zip & Share

May 14th, 2012

In both my work and personal life, I regularly need to share files with others, and the best and most flexible method that I have found is through Dropbox’s excellent Public folder. There are several limitations to this method however:

  1. Files in your Dropbox folder aren’t secure, and are publicly searchable;
  2. Files in your Dropbox folder become stale and require regular deletion to not consume your space and create clutter;
  3. Getting a group of files into your Dropbox and sharing it with others is a tiresome process if done regularly.

To tackle these limitations, I combined the power of Keyboard Maestro with the persistence of Hazel,  creating a very powerful and secure method for combining, sharing, and maintaining your shared files. Here’s how it works.

Initial Setup

First you’re going to need Dropbox, Hazel, and Keyboard Maestro. Those are mandatory.

With that productivity trifecta installed, browse to your Dropbox Public folder and create 5 different folders called 1,3,7,14, and 30. I put these folders into a folder called Temp in my Dropbox/Public folder, just to clean things up. These folders represent the amount of days that a file in that folder will be available.

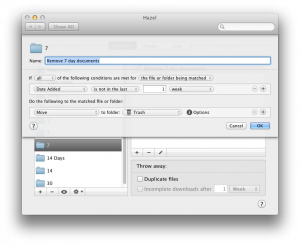
To achieve this, launch Hazel and create a single rule for each of the folders so that if Date Added is not in the last X days, Hazel will move the file to Trash. See the screenshot on the right.

From then on, Hazel will take care of the file maintenance in those folders after the specified amount of time has passed. Now let’s make it simpler to put files into our newly maintained folders.

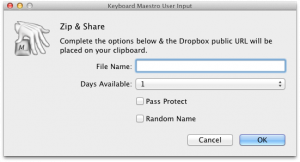
To save extra time and clicks, I created a Keyboard Maestro macro from a simple window allows me to:

  1. Compress the selected Finder files into a single zip file;
  2. Name the file as I wish;
  3. Select a duration for the file to be shared ;
  4. Randomize the file name, if needed, via Merlin Mann
  5. Password protect the zip, if needed, via Kaushik Gopal

With those options set, Keyboard Maestro creates a zip file accordingly and move it into the correct folder Public/Temp folder in my Dropbox, and puts the public URL on my clipboard, displays an informative Growl notification.

The Keyboard Maestro macro is available for download here (now version 1.1, see below).

Finalize the script by adding your own Dropbox ID and path to your newly created Dropbox/Public/Temp folder. If you find any bugs, or have any feature requests/improvement suggestions, please let me know.

I just finished this script last night, although I have been using a version of it for over 6 months, almost on a daily basis. The final pieces were put in place by Kaushik Gopal, who wrote the brilliant KM Macro/AppleScript to compress, and password protect multiple files while randomizing the file name.

Update – May 20, 2012: Zip & Share v1.1 released: fixed a bug preventing the zip from being password protected (if selected). Also cleaned up a bit of the AppleScript. Thanks again to Kaushik Gopal who helped me catch these issues.

See all my Keyboard Maestro posts.

Repeating Tasks in Daylite

April 5th, 2012

I have a ton of other things that I should be doing, but I couldn’t help but share my new creation: Repeating Tasks for Daylite.

While it seems like the guys at Marketcircle thought of everything in Daylite, I always missed the ability to have repeating tasks. Lots of people have requested it, and Marketcircle has stated that the feature is under consideration, but until it is actually developed, here is a (fairly ) easy  solution. In fact, here are two different ways to have repeat tasks in Daylite, one using the venerable Keyboard Maestro, and the other using iCal (or Calendar as Mountain Lion calls it).

Using Keyboard Maestro

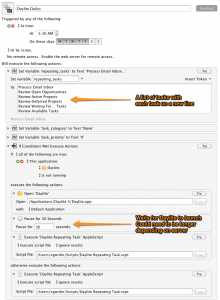
Daylite Repeating TasksThis is my preferred method, as it lends itself to simple inputs, changes, and duplication. It is also  a great example of the power of Keyboard Maestro to simplify everyday tasks (no pun intended). If you don’t own Keyboard Maestro yet, go buy it for 20% off with this link.

In this method, Keyboard Maestro is used mainly to handle the scheduling and store the task names, category, and priority. The rest is handled by an Applescript that creates the tasks and sets the parameters, including the due date (current date).

For my daily tasks, I have the macro run every weekday morning at 5:30am. The macro checks if Daylite is running, and if not, will launch Daylite, wait until it has loaded, and then run Applescript as needed. Some adjustment of the wait time might be necessary, depending on your Daylite server speed and internet connection.

Click on the screenshot on the right to see what the Macro looks like. Below are the downloads:

  1. Applescript for Keyboard Maestro;
  2. Keyboard Maestro Macro (requires inputs and you pointing the Macro to the Applescript).
I should note that while the Keyboard Maestro method is definitely the simplest, the disadvantage of this method is that you can’t easily schedule tasks to repeat with complex schedules, such as every other week.

Using iCal/Calendar

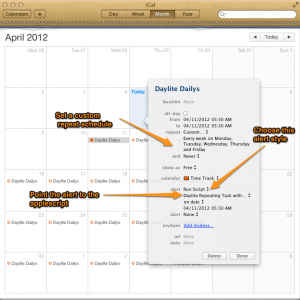
Repeating Daylite Tasks using iCal/CalendarFor those that don’t own Keyboard Maestro (I can’t recommend it enough if you’re looking to automate things on your Mac), I also created a version of the Applescript that can be edited manually and scheduled using iCal/Calendar.

With this method, you edit the Applescript  with your task names, category, and priority, and save the script. Then, create a repeating event in iCal with an alert. One of the alert options for a calendar event is “Run Script”, so point it to the applescript, set the alert time, and you’re set. For an example, click on the screenshot on the right.

Download the applescript for iCal/Calendar v0.2

It should be noted that the iCal/Calendar method has several disadvantages of various degrees. First, the applescript requires Daylite to be running when the script is launched by iCal i.e. it does not currently check if Daylite is running. This should be relatively easy to do with Applescript or a shell script, but I’ll leave it to better people to write that code. This also The script clutters your calendar, which, for me is added noise and therefore a deal breaker. There’s little error checking in either method, but that’ll be left to someone else.

Update 04.07.2012: Don Morris in the Marketcircle forums contributed the 2 lines needed to make the script independent of whether Daylite is running. It will now launch Daylite if it is not running. Thanks Don!

Acknowledgements

These scripts and workflows are based on the excellent work of the following people:

  1. Casper Lassen. Refer to this Marketcircle forum post and (I think) his website
  2. Alex Bratton at Lextech,this Marketcircle forum post, and @alexbratton
Finally, if you find any bugs or better ways to accomplish this, please let me know!

See all my Keyboard Maestro posts.

Linking and Lists with Keyboard Maestro

March 31st, 2012

I’ve (relatively) recently become obsessed with Keyboard Maestro, a brilliant app that allows you to automate various tasks and actions on your Mac. If you want to know more about Keyboard Maestro, I covered it at length in Episode 18 of my Simply Apple podcast. Also be sure to check out Gabe Weatherhead’s excellent site MacDrifter, where he covers his Keyboard Maestro macros regularly.

I’m planning a series of posts where I share some of the Keyboard Maestro macros that I wrote to simplify some of my everyday tasks, so here’s a couple that I use regularly:

Linking

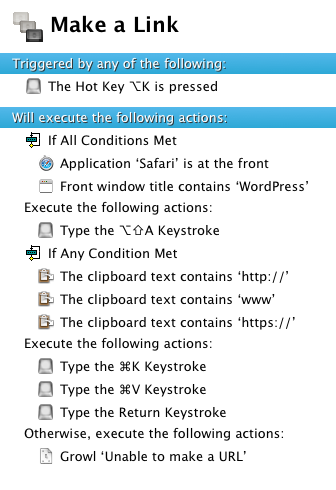
I write several dozen emails every day between work, my personal projects, and everything else that’s going on. Whenever I need to send someone a link, whether to a file in my Dropbox or a link to an article I loved, I rarely paste the actual link itself, typically opting to make a portion of the text a link instead. On a Mac, the typical workflow is:

  1. Copy the link to your clipboard
  2. Select the text to change to a link
  3. Press CMD+K (or find it in the toolbar or menubar)
  4. Paste the link
  5. Press OK

Instead, I wrote a short Keyboard Maestro macro that simplifies the process, saving a few clicks here and there and letting me get on with my email. Once you have the URL on your clipboard, all you have to do is select the text and press Option-K. The macro even includes some logic to check if you have a valid URL on your clipboard (writing a URL without the http:// is bad practice but does indeed work on most systems).

I use this macro daily, and it works in most places on your Mac, including Mail, Evernote, etc. You can see the workflow above, or download the macro here.

Lists

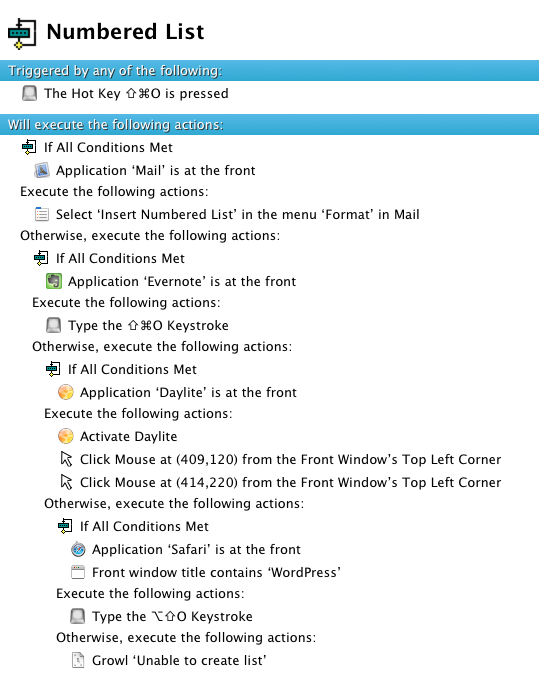
In the spirit of brevity, I often write emails and notes with numbered (ordered) lists in them, summarizing the important parts of what I’m working on (see the list above). The problem is that there’s no normal shortcut for making a numbered list in most applications, and where there is one, it’s likely unique to the application itself.

Therefore, I wrote a KM macro that unifies the shortcuts where there are some (Mail, Evernote, WordPress in Safari) and enables the shortcuts where there aren’t any (Daylite).

As before, you can see the workflow on the right, or download the macro here.

These are just some examples of beauty of Keyboard Maestro. Find out more about the app on its website, and purchase it with 20% off ($28 bucks!) here.

See all my Keyboard Maestro posts.

my writing

my website is a collection of my work and writing since 2004, so please don't be surprised if things seem a little outdated, particularly in the technology section. That said, the concepts behind most posts should be interesting given all that's happened since they were written so enjoy!